
This post and photos may contain Amazon or other affiliate links. If you purchase something through any link, I may receive a small commission at no extra charge to you. Any supplies used may be given to me free of charge, however, all projects and opinions are my own.

Thank you so much to Expressions Vinyl for including me as an Ambassador for the month of September as well as for providing the vinyl used in this project!
Football season is finally back in Texas! One of the best parts of living in a college town is getting to feel game day excitement. Our houses, stores, and roads are all lined with Aggie Flags on game day. The campus is always bursting with energy. Texas A&M just recently added onto Kyle Field and fans are still pumped about Johnny Football and the move to the SEC. Even on days that we don’t have tickets, we still go up to campus to check out the tailgaters, the Cav, pet Reveille, and to watch Step Off. Game day in College Station is very family friendly, and very easy on the wallet. I’ll be honest though, the other part-- game day tickets and all the gear—for a family of six—that is just too pricey for me! Even just the fan paraphernalia is expensive. My boys love the Aggie clothes, but with them growing like weeds, the mall prices or bookstore prices are just too high. That is why I was so elated when I discovered Expressions Vinyl.

You know I love my cricut. I use it all the time. Expressions Vinyl offers the vinyl that can be used in any cutting machine (or even by hand) at a fraction of the price of it’s competitors. Earlier this year, I used the regular vinyl and was very impressed with it. When Expressions Vinyl contacted me and asked if I’d like to try the iron on vinyl, I didn’t hesitate for a second. Using this vinyl, I was able to make some football shirts for my boys. Today I’m sharing how you can use the same materials to create a t-shirt for any team you root for! The best part is I’m not the only blogger who made football shirts—there are some other great ideas out there, so be sure to check them out on the Expressions Vinyl’s Blog!
How To Use Iron On Vinyl To Make A Shirt For Any Fan

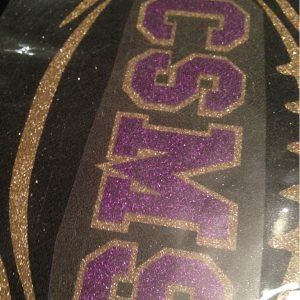
Our second oldest son is currently playing on his Jr High team, but unfortunately has an injury and is on the sidelines. He was happy I made a shirt with his school colors, but I know he’d rather be suited up on the field wearing his jersey!


So let’s get started on how easy this is to recreate!
First, I used Easy Weed Heat Transfer Vinyl for the Aggie shirt, and Glitter heat transfer vinyl for the school shirt. The vinyl shipped super fast, and came neatly packed in a mailing tube. You will need to pick your favorite logo or design and edit it in your favorite software. To use the vinyl for the shirts follow the following steps:
1. You are going to be making what is referred to as a KISS cut. The kiss cut goes only through the iron on material, but leaves the clear liner still perfect. If you look at your easy weed vinyl you will see there are 2 sides of film. The clearer part is the clear liner for ironing the vinyl on. You need it to stay on (and not to be cut). You will set your machine for the kiss cut (mine is blade 3- pressure 3- speed- med). You should lay the vinyl down with the shiny side (the clear part for ironing) towards the mat.
2. IMPORTANT STEP! You need to flip all your images so they are a mirror image. Remember, you are cutting your material upside down. Once you are done, run it through your machine. Yay!

3. I like to peel my mat off the vinyl. Here you can see the ironing liner is still intact but the brown vinyl has been cut. Cut off your excess vinyl to use in another project. Flip your vinyl over and remove the leftover, commonly referred to as “weeding”.

4. Estimate your placement and try to decide where you like your vinyl best on the shirt. You can mark with pens or erasable fabric markers. To iron the vinyl on, you will need to have your iron set at the highest temperature, with no steam and you will need to use a press cloth. The plastic liner will not work as a press cloth (don’t ask me how I know!). Preheat the area of your shirt where you will be ironing the vinyl on for about 15 seconds. Place your vinyl in the desired spot and lay the press cloth over it. Apply pressure with the iron for 30 seconds, and then pick the iron back up and place it down in the next area. Do not do the traditional side to side sliding motion with the iron—you will need to always lift it, to keep the vinyl from moving. Once you have covered the entire area, flip the t-shirt over, and do the same on the back. After that, I like to press one more time from the front. Peel off the clear ironing liner. If you have an area that didn’t adhere, place the liner back over along with the press cloth and repeat again.

5. If you are layering different colors, save your larger clear iron on liner to cover both areas. After the first layer has been adhered, place the second layer (with it’s clear liner) on top, and then place the first layers liner on top of that. If you look at the above picture you can see how I have done that.
And there you have it! Easy as can be, and so much less expensive than what the stores sell them for. Plus—you get the satisfaction of knowing you created it!
Are you ready and excited to get started on your own?
Looking for more ideas on what to do with your cutting machine? Check these out:
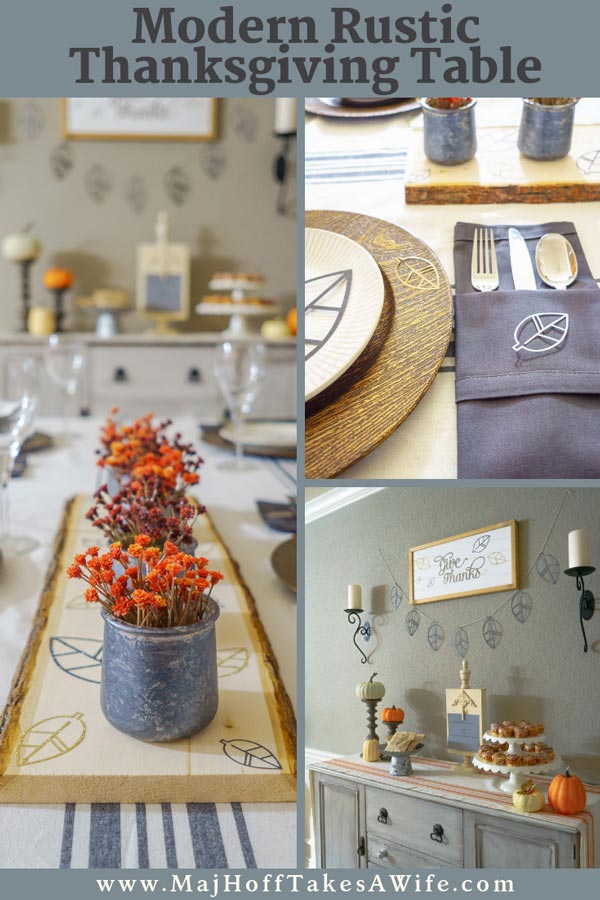
Modern Rustic Fall Tablescape With Your Cricut Machine

Easy Custom Monogram Custom Aprons with Glitter Vinyl

How to DIY a Custom Worn Wood Sign

Easy DIY gift boxes with your Cricut Machine

Personalize a Camp / College Foot Locker
Want to see what recipes I’m working on, things I’m crafting, clearance items I’m finding or what my family is up to? Be sure to follow me on social media!
![]()
![]()
![]()


CamilleW says
hmmm, best football experience? High School football with the Odessa Permian Panthers (Friday Night Lights). MOJO!!! Class of '71.
Laura - Eye Candy Creative Studio says
these are great! I need to make one for everyone in my house! =)
Morena Hockley says
Even though we're Longhorn fans in our house I can still appreciate the shirt. 😉 Great job!
Mabey She Made It says
What is the best way to wash these shirts with the HTV? They're awesome!
Cori George says
These are really great! I love the sparkle iron-on 🙂
Tracey Hilborn says
I'm ready to try Expressions Vinyl.
Brenda Keeney says
I would love to find out where you got the graphic