
This post and photos may contain Amazon or other affiliate links. If you purchase something through any link, I may receive a small commission at no extra charge to you. Any supplies used may be given to me free of charge, however, all projects and opinions are my own.
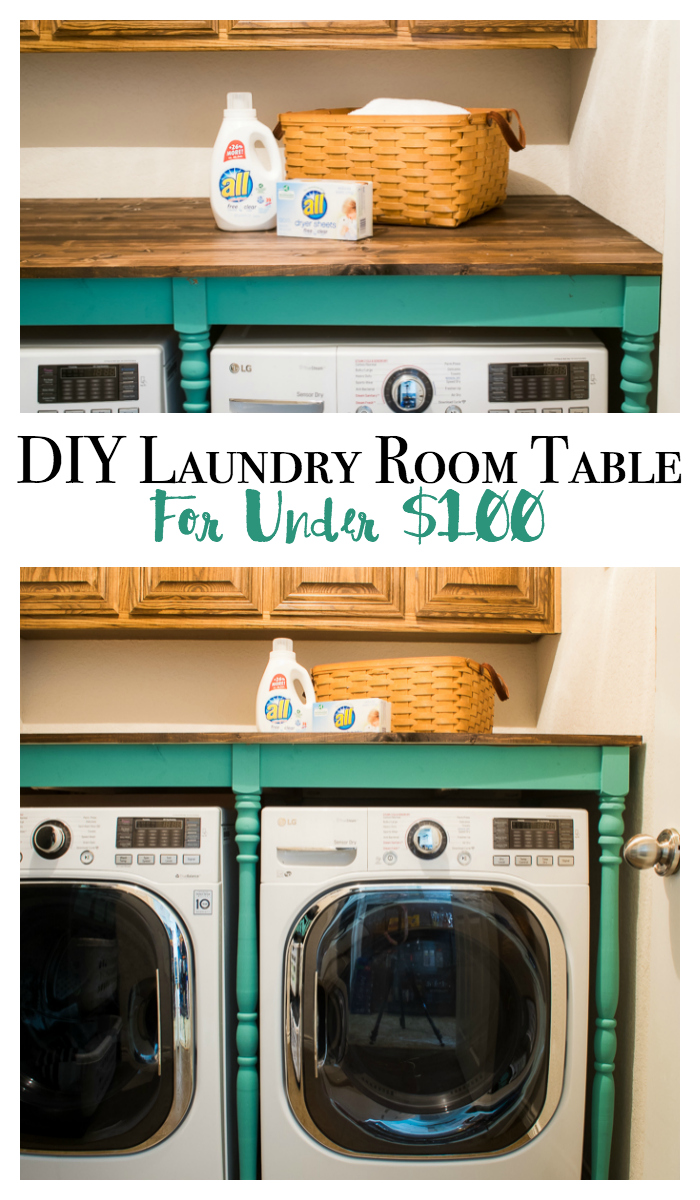
Need an oversized table for the laundry room? This step by step guide shows how you can build a table to cover your front loaders for under $100. No more lost socks falling behind!

OVERSIZED TABLE FOR THE LAUNDRY ROOM

This shop has been compensated by Collective Bias, Inc. and its advertiser. All opinions are mine alone. #FreeToBe #CollectiveBias
We’ve had front loaders for over 10 years now. In fact, this year we bought our second set. I’m not a pedestal person, mainly because I need all the storage on top I can get. It’s just that this set up left me with one issue. Things were always falling in between, behind, and beside the washer or the dryer. We also have a good 10 inches where the washer and dryer are not against the wall. I needed a way to recoup that missing storage space. I’m not the first person in the world with this issue or idea, and Pinterest will show you a million ways of building pedestals, folding tables, and all kinds of storage for the laundry room. I was able to build this table specifically for the laundry room in under $100 in building material. I’m excited to share with you my laundry room progress, but I wanted to assure you that one thing is staying the same. Long time readers know I’m a fan of all® free Clear detergent. I’ve even joined the all® free clear community (You can join too!). My room is getting a makeover, but my detergent is not!
It all started with my inspiration board from last year:

I decided to finally get started on this room. Honestly, the hardest part of this build was figuring out the calculations. You want to be sure to know exactly how tall your machines are, how wide they are, and how deep they are. Next, you need to figure out how close to the legs you want them I gave mine about a ½ inch of space. For your table, you need to calculate how long your apron pieces will be, and remember that they need to be positioned ABOVE your machines. For instance, I used a 1x4 board for my apron, so I knew my table legs had to be at least 4 inches taller than my machine. I was lucky and had this guy helping me out:

Going to the lumber/building store is always an adventure with my littlest boy. He has a true curiosity for building and loves to help out. We met a lovely gentleman in the parking lot who was building a tree house. I knew my son was green with envy.
In the laundry room, we measured more than once to ensure our calculations would be correct. I brought the lumber home and cut it with my miter saw, but most big lumber stores will cut it for you if you ask. Some charge a minimal fee, but if you don’t have the large equipment at home, or don’t want to deal with it, I highly encourage you to use this option.
As I mentioned before, I’m not the first to build something like this. When I need building tips, I go to Ana White’s website as well as the Shanty Girls website. Both have FABULOUS youtube videos that will give you all the info you need to build a similar project.
The tutorial I used for the table base can be found here (I used the basics without a drawer, and also factored in that I would have middle legs as well).
She did a wonderful video on building a table top.

For this build, I built the table base first. I knew it wasn’t going to fit into the laundry room, but I wanted to make sure I got everything right. I also went ahead and painted it while it was in an open space. Once the base was finished, I took it apart in a few sections so it would fit through the door. I then arrange the main bottom areas around my washer and dryer. Once that was together, I added in the extra braces for support (I used one in the middle, and one in the middle of each the washer and dryer). I will admit, this is a bit precarious because of the tight space, angles and height.

Once my table top was pieced together, I stained it outside and let it rest so my laundry room wasn’t overwhelmed with the smell.
And then…..just like magic…….we went from this:

To this:

I think I love the depth of the table the most. It’s 38 inches! Just over 3 feet of prime storage and folding area.

You can see my black bookshelves to the left that house 4 baskets for laundry and other handy laundry room items.

My bins are painted the same color as the table legs (and yes, that’s real laundry in the baskets)

There is very little gap between the table top and the wall. Know what that means? No more socks falling behind!!!!

I added a bit of artwork to cheer things up. I was surprised at how well the stain matched the existing cabinets. I’ve gone back and forth about painting them. What do you think?
My breakdown for wood materials is as follows:
- 3 white wood boards 1x4x8’s(for the apron) = $14.91
- 7 white wood boards 1x6x8’s (for the table top) = $50.89
- 2 2x4x8 boards (for middle support) = $4.68
- 6 legs $8 total at the Habitat For Humanity Restore (you can substitute 2x4's and keep your cost down as well)
TOTAL FOR THE BUILDING MATERIALS = $78.48
Other items I did use but had on hand: Paint, screws (along with my kreg jig), and wood glue. The power tools I used were my drill and my miter saw.
The table legs are really unique. They really don’t make legs this long. Instead, this was from the Habit Restore. Maybe you recall in the 80’s / 90’s, a lot of houses had half walls, that then had open bannisters going up to the ceiling. You see them get knocked down a lot on shows like Fixer Upper. I found a fully intact set at the Habitat Restore and purchased them for $8! For 6 “legs” that was an incredible price.
The best part of this project was building it with my little helper. Some people might shy away from having little ones building with them, but if the correct safety precautions are taken, it can be a great bonding experience. My little guy isn’t allowed to use the saw, but he can turn a screwdriver like nobody’s business! We try to let our kids dive into things they enjoy and let them be “Free to Be” with in reason.

If you’ve been a long time reader, you know we are loyal all® free clear detergent fans. My laundry room always has a bottle. I’ve been openly honest about our struggle with eczema and switching laundry detergent was a big part of helping our son. You can see all my tips and tricks here.

The truth is, now I hardly give it a second thought. all® free clear detergent leaves me “Free To Be” not worried about skin issues. Besides the all® free clear detergent, I’m also a big fan of the all® free mighty pacs® and the all® free clear dryer sheets. My laundry room is fully stocked, and my mind is still at ease, because all® free clear detergent is the #1 brand for sensitive skin. Dermatologists, allergists, and pediatricians have also ranked it the #1 recommended detergent.
CLICK HERE FOR MORE INFO ON ALL® FREE CLEAR PRODUCTS!
STAY UP TO DATE ON PRODUCTS, IDEAS, OFFERS AND MORE!
What about you? Do you love all® free clear detergent as much as I do? Do you want to build a DIY table for the laundry room? Do you think I should paint my cabinets? Let me know! I love to hear from my readers!
Don’t forget to join the all® free clear community!
Follow all® Laundry on social media!:
Facebook | Twitter | Instagram | YouTube
Be sure to look for all the all® free clear products at your neighborhood Walmart. 


Anonymous says
I like it. Almost makes me want to do laundry!
Emily Stephens says
What a great idea! I'd love to build something like this for my laundry room! #client
Dinner then Dessert says
Wow, this is so awesome! I LOVE the color too!
Debra Pashkowsky says
My laundry room looks similar to yours, right down to the washer and dryer. I really like what you have done and now I really want to try to make the table. Does it slide out easily in case you need to replace the dryer vent hose or something like that? It looks fantastic.
Sherry Cole says
I chose your awesome laundry room table as my feature tomorrow on Totally Terrific Tuesday! I love the color that you painted it. Great job!
MrsMajor Hoff says
Wow! I wish it gave me that super power!
MrsMajor Hoff says
Thanks Emily! It is surprisingly simple really. It took more time to paint it then it did to put it together!
MrsMajor Hoff says
Thanks so much! Everyone needs some fun color in the laundry room!
MrsMajor Hoff says
Great question! I love our front loaders but our first set sprung a leak and we had issues so I remember the pain of the washer and dryers being pulled out. I purposely only screwed the top in from the front. I knew it wouldn't be moved around a lot and so I didn't need to do the back. The w&d could still slide between the legs as well. If all else fails, it's probably pretty easy to take apart a few pieces if you had to.
MrsMajor Hoff says
Thanks so much Sherry, I appreciate it! Glad you enjoyed the color too 🙂 Always fun to have a pop of color in that room!
inkhappi says
I love this project. Great job Sara! I love the baby eczema tips as my grand daughter has eczema. Thanks for sharing!
Anonymous says
I just came from Cedar Hill Farmhouse. Love love this! And YES! I think the cabinets should be painted. Personally I'd do black to match your shelf.
-Lea
Lori -thestonybrookhouse says
Sara! I am green with envy on your laundry room table!! Soooo pretty! Glad to see you're feeling well enough to tackle this awesome project!!
Thanks for sharing and linking up at DI & DI 🙂 Love your creativity!
Mary Hunnicutt says
What a lovely idea! I love the legs on the table!