
This post and photos may contain Amazon or other affiliate links. If you purchase something through any link, I may receive a small commission at no extra charge to you. Any supplies used may be given to me free of charge, however, all projects and opinions are my own.
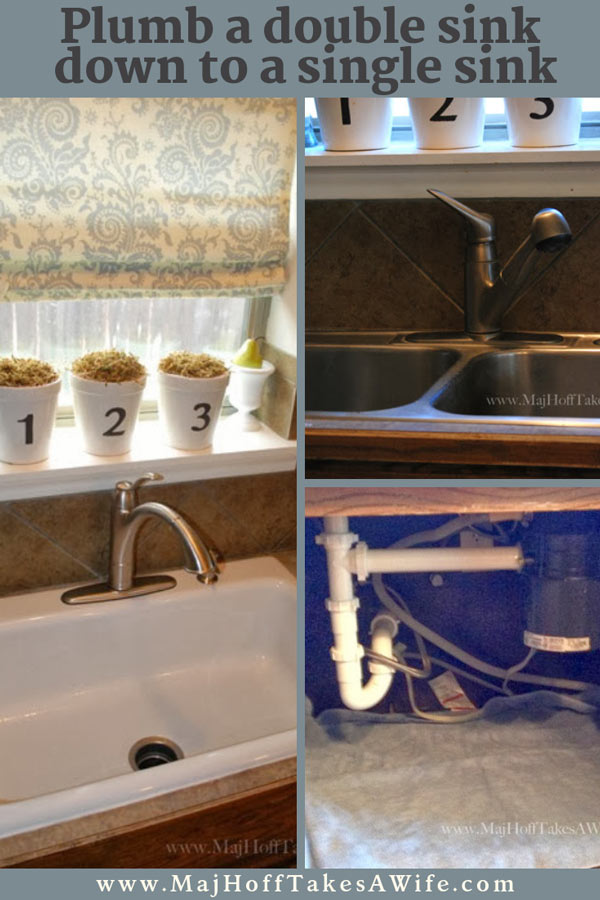
This is our new gorgeous sink. But it wasn’t always this pretty. Today I’m highlighting how we changed out the sink from a stainless steel double sink to a single basin sink.

This is our old, ugly, builder grade, nemesis- I mean sink. I have nothing against a stainless steel double basin sink. It did it's duty. But the farmhouse look of the white just makes my heart sing.
I posted this post in February of 2014. Now here we are in 2020 and that sink still makes my heart sing. Also, it seems that a lot of you are looking for exactly how to go from two drains to one. My posts now include a lot more info and step by step photos. I apologize that back then I used a cell phone camera (cringe) and no technical details whatsoever.
We all learn over time right?

So hopefully you saw my post about my new awesome Moen Faucet. This is sort of a 2 step project. The first part was getting the faucet into the sink basin. The second part is getting the new sink basin in. That proved to be harder than expected.
First, We had to pop out the old ugly sink.
This was the part that sucked the most. You are underneath the sink unscrewing clips that hold the sink in (this is not comfortable for any human being. Bring a pillow for your back!). You also have to disconnect the pipes. We had a 2 drain system (one being a garbage disposal).
We untwisted the garbage disposal first and then disconnected the second drain & the water lines from the faucet (all power and water was off for this one!). Once we were totally disconnected, we removed the sink. It came up easier than I thought. My husband kind of bumped it up from down below and with a nice big pull the hideous sink was history!
We were replacing it with an awesome white sink basin that I found sitting on a shelf at my Habitat for Restore Store. It had been a display at Lowes previously and I got it for a steal!
New Single Basin Sink Install
To set the sink in place, we used a bead of construction adhesive along the lip of the sink that would fit against the countertops. We placed the sink in exactly where we wanted it and waited a few hours for it to dry and hold. We also took that time to connect the water hoses from the faucet underneath the sink.
After that was over, we began our joyful experience with plumbing (insert sarcasm here). We were going from a 2 drain set up that looked like this:

And we were trying to make it a single basin (with the drain connected to the garbage disposal).
After we disconnected the sink drains we were left with this:

The original part that the disposal twists into is actually still in our old sink. We replaced the disposal but not the sink connection part earlier in the year. The sink drain/disposal parts were still in a bag in our garage and so my dad was nice enough to add that to the sink before he left our house to go back home.
Because the single drain is in the middle of the new sink, our garbage disposal moved over and the line that went horizontally from it was too long. So off to Lowes we went to find the pieces that would fit the leftover plumbing pieces like a puzzle. A very hard puzzle. I thought my child might be better at this than I was, so he tagged along.
These were some pictures that I texted to my husband at some point during my 4 trips to Lowes in 1 day adventure:

We discovered several things. Like the pipe that connected to the disposal had a funny little lip that we needed (not threaded).
At this point, my Dad the handyman is gone. I’m texting pictures, but it’s getting really complicated. I would get home and pieces wouldn’t fit, or the seal wasn’t good enough, or we’d have to cut the larger pieces with the miter saw. Panic is setting in, because 4 boys with no working sink is not a situation I want for an extended amount of time.
At 9:30 at night, we finally got a set up that worked, but it would drip a few drops now and then. I knew the specific piece we needed, but Lowes was out of stock, so we made do for about 5 days with this not-quite-ideal set up. A sort of working sink was better than the alternative at this point.
We kept a bucket underneath it, along with towels. But at least everything “worked” and I wasn’t without a sink for those 5 days.
Here is the temporary set up that I would NOT recommend:

Finally we hit the jackpot and Lowes got the part we needed in. And then it was like magic. If we would have had this part from the beginning, I would have said replacing the sink was easy peasy! I've discovered that like a lot of things in life, magic doesn't always instantly happen.
Here is the magic set up!

What I love the most about going to the single drain is that I have soooooo much more room under my cabinet now. Before, the plumbing and the disposal took up a lot of the cabinet space. They were each in a bad spot, and not close to one another. Look at the size difference on each side now— all my tall bottles fit!
Not only that, but washing large dishes in a single basin sink is a dream. My cookies sheet fit, I don't have to angle them to wash them. Same for casserole dishes and oversized saucepans.
BEFORE & AFTER

I went ahead and put down a really nice heavy duty shelf liner that was clear, but I didn’t like the way it looked, cause it was kinda plain, so I put some pretty wrapping paper cut to size down first, and then topped with the clear shelf liner. I did the same set up when I organized my kitchen sink drawer.
One of the last steps is to caulk the sides of the sink. I watched a few youtube videos and since I’ve used caulk on other projects I thought I’d be good to go. Not so fast!
We purchased silicone caulk, because it was the best for waterproofing. What I didn’t know is that the regular caulk is pretty forgiving and will wipe off fairly easily. Silicone, not so much. After a frantic google search I discovered that rubbing alcohol works well.
WHEW! Lifesaver! So now the sink is in and we are happy. Here are some pictures of my new favorite part of my house:

I am love with the single basin. Since we are a large family, I tend to cook with bigger pots and pans. They all magically fit in here! It’s just perfect for washing cookie sheets, or piling about 8 cereal bowls in at one time (not that dirty dishes will ever sit in my sink now!). Six years later, the sink is still going strong. I use Mrs Meyer's baking soda to clean it.

The Walden faucet adds the classic touch, and goes with the vintage/farmhouse look that I love so much. The secret MVP turned out to be the side soap dispenser. I use it way more than I thought I would.
When my hands are dirty, I use my forearm to press it down to dispense the soap. That way my germ filled hands don't touch it. Much easier than trying to figure out what to do with a whole big bottle of dish soap and messy hands.

The only downside of having a single basin is having to use the countertop as a drying space. We've gotten used to that though, and I only lost about 12 inches. Being able to wash larger dishes so easily makes up for it in my mind.

Before:

After:

So what do you think? I wasn’t intimidated by the faucet, but I was with replacing the sink, unhooking the disposal and replumbing the lines. In the end they weren’t that bad at all.
I did need hubs for the heavy lifting part. I’m so glad we did this little reno. We estimated it would take a couple of hours, and really……..if we had every single piece, it probably would have. That said, we didn’t. So it took closer to a week. Isn’t that how most DIY projects go anyways? Six years later, that tiny amount of time pales in such comparison with how happy we are to have done this project.
The number 1 question I get about this project is which piece was the magic piece. At Lowes it is Item # 47394 Model # 85580K, or Keeney 1-½ inch plastic disposal elbow.
Thanks for taking the time to read my installation story, hopefully it will help you! Be sure and stop by and visit some other popular DIY posts, like our DIY garage door makeover or how to DIY a table over a washer and dryer. Of course there are also lots of recipes and travel ideas on my site as well!


Jags Jewels says
I am getting ready to do the same thing (same sink, different faucet, taller) so I was very happy to see this. thanks so much. It gives me a little more self-confidence. Joyce
Kelley says
Hi, URGENT HELP needed! What is that magic part exactly called? Can you link the lowes link? We are in the middle of doing this and would GREATLY appreciate it! Great write up btw! Thanks, Kelley
MrsMajor Hoff says
I do know the part! 85580K Disposal tailpiece for in-sink-erator Inlet 1-1/2" outlet 1-1/2"
it also has 47394 above the SKU. The SKU reads 04622400533. Hope that helps!
Anonymous says
Hi, I'm about to do the exact same thing with my sink. I think I've found the magic piece you were talking about http://www.lowes.com/pd_47394-143-85580K___?productId=1088325&pl=1&Ntt=disposal+tailpiece . I've never done any plumbing before in my life. Could you please explain how you connected the piece to the disposal and the rest of the pipes? Did you just slide it on and that was it? Or did you have to glue/seal something? Thank you!
MrsMajor Hoff says
That's the piece! We didn't have to do anything but just twist pieces on, kinda like putting a lid on a pickle jar. I don't recall anything complicated. Glad to know people are using the tutorial!
Melissa Fowler says
Thank you so much for this tutorial. Ive been trying to decide whether or not to get this beautiful single drain sink. The garbage disposal was always the concern for us. You gave me hope.
MrsMajHoff says
It was one of the best things we ever did! I am so glad we did, and it wasn't as hard as we imagined!
Shubhdha says
Thanks. I am in middle of doing this. Here is my concern. My current sink is 8 inch top mount dual basin sink. I want to do 10 inch undercount single bowl sink. Some of the people I called say it’s ok to do it. Some of them say that no I do not have I enough space. I am still confused. Would you be able to guide me.
MrsMajHoff says
I honestly have no idea, as that wasn't something I encountered. Hopefully someone has an answer for you!
Ellen P says
So... you don't have a dishwasher???? If most people looking at your tutorial do have one, the whole setup is quite a bit more complicated. Or at least somewhat more complicated. Just thought I'd mention that. Lots of good info here though, including that part number! Off I go to the hardware store. 🙂
MrsMajHoff says
Hi Ellen, I do have a dishwasher. Couldn't live without it, lol! If you look at the 3rd picture, you can see there is a hose that is a little lighter in color than the white PVC parts. That is the dishwasher connection. It goes from the top of the disposal to the dishwasher. Great question!
Kristen says
Phenomenal post! Thank you SO much for this! I’ve been wanting to change my double bowl sink to a single for a long time and thought it just wasn’t an option with with disposal over here and pipes over there and the dishwasher hose back there. Lol! Not only is it possible, but you explain it so incredibly well that it seems like it might be easy. I’m so excited to use your post to make my kitchen dreams come true! You are so awesome!!! Thank you!!!!!
Kate says
I’m debating going from a double to single basin sink and your post is exactly the information that I need. Thank you for sharing!
Loren says
Ok so question. I’m about to do this too, husband thinks we need to hire out but I’m not so sure. Anyways, I see you have a dishwasher, but you don’t have that drain wash out thing that goes on the sink by the faucet. Is there any reason why one would or would not need this?
MrsMajHoff says
Great question! I'm pretty sure we do have the drain wash out- but I might not have taken a picture of it. I will look under the sink tomorrow and double check, but if memory serves me it was like an accordion style plastic drain that was whitish that was separate from the other stuff (ie, it left the dishwasher and went to a different area of plumbing we hadn't messed with. Again, I'll check tomorrow if possible to see if I'm remembering correctly! Thanks for reaching out!
Loren says
So I did some more research and I guess it’s called an air gap. And they’re required here in CA! They are mounted on the sink near the faucet and they’re ugly.
MrsMajHoff says
You learn something new every day! I just googled pictures and saw what you mean. I just looked and ours does go up but not to the sink, but to the top of the disposal. Interesting to see what other states require.
Carl says
Loren,
The purpose of the air gap is to allow air to be drawn into and pushed out of the drain. When water enters the drain, it displaces air, which has to go somewhere else. The air gap creates a path of least resistance for air to escape the drain plumbing.
MrsMajHoff's sink likely has an outside vent connected somewhere along the dishwasher line. This serves the same purpose as the air gap on your sink.
Here in Tennessee, we can use an Air Admittance Valve (AAV), and it's installed after the trap. This equalizes pressure by allowing air to be drawn in when water flows out the drain--think of the way punching a vent hole in the top of a juice can allows you to pour more smoothly.
Without these venting measures providing somewhere for the air to go, it must escape in one of two other ways: gurgling and bubbling through the drain or escaping through the trap. Gurgling is annoying, but if air forces through the trap it removes the seal that keeps sewer or septic fumes from emerging from your drains. We can all agree that is an undesirable outcome!
MrsMajHoff says
Wow Carl, thanks for all that info! I appreciate you taking the time to explain it for us.