
This post and photos may contain Amazon or other affiliate links. If you purchase something through any link, I may receive a small commission at no extra charge to you. Any supplies used may be given to me free of charge, however, all projects and opinions are my own.
This easy DIY mug holder is so easy to make! Stain or paint an unfinished premade wall shelf any color you'd like and add hooks for easy cup storage!

This post is sponsored by Walnut Hollow. All opinions are my own. This post also contains affiliate links. I only recommend products or services I use personally and believe would be a good fit for my readers. This comes at no added cost to you!
Over the last few months, I've been all about finding new ways for creating storage in my house. A few months back, I talked about my obsession with white dishes and showed you how I added more space by adding farmhouse style shelves in my dining room. Well, it turns out, I found more white dishes for my collection, so I needed another storage option!

When I was at Round Top a few weeks ago, I went ahead and added a BUNCH of dishes to my collection. One thing I stocked up on were white espresso cups and saucers, tea pots, and tea cups. They can be kind of precarious to stack, so I knew I needed to come up with something.
While there I spied an amazing wall shelf with the cutest little hooks but the price was WAY out of my price range. Like $200 more out of my price range. The idea was planted in my head though, and so I had my wheels turning.

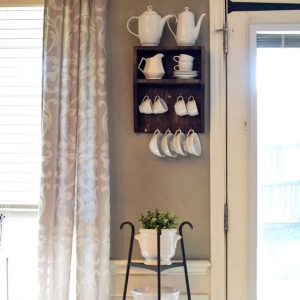
When I looked at the Walnut Hollow website the first time, I saw the wooden display shelf and I knew it would be perfect for this project. Do you know what makes it the most perfect? There is nothing to build. No saws to get out, no nail guns. I simply needed a drill to make pilot holes for the cup holders. You could probably get away without that, but I'm a weakling, so I needed it.
The shelf is solid raw pine, so the possibilities are endless. You could use a colored stain, chalk paint, any finish you'd like. You will add the wall hooks onto it, so you can pick which direction it goes as well!

This project took under an hour, with the exception of the stain drying time. Plan on an afternoon, but with a lot of time in between staining to get other things done.
So let's see exactly how easy this was!

I started by grabbing my supplies. I used the Minwax stain I had on hand that was used for the dining room shelves. I always stain with an old t-shirt that has been cut into smaller pieces, and never stain without a disposable glove!
The plastic tablecloths sold at the dollar store are ideal for projects like this. I usually cut it in half, and use it to cover the surface I'm working on to make sure they are protected from any drips or spills.

I also gathered a friend to help me, but instead of engaging me in conversation, or helping in any way, he took a nap in the grass. If he wasn't so cute, I might have been more upset!

When staining the shelf, I worked on the inside box first. Move it in all directions and make sure you get all the areas where the wood is joined. I did not stain the back because no one will ever see it!
After about 10-15 mins, wipe off any excess stain. I'm a messy stainer. I remember for years thinking there was this magic key to staining, but it's really pretty straight forward.

Once dried, it's time to measure for the cup holders. Your math will depend on how many hooks you place on the inside. I ended up doing 5. The tricky part came up at this point.
The shelf edges sort of block things in, so unless you have a ruler the perfect size, it won't work. I solved this by using a fabric tape measure. I used a regular ruler to measure from the shelf point, and also from the bottom. A sharpie came in handy for marking the dots.

The cup holder hooks were tricky little suckers. I drilled the pilot holes with a drill bit that was one size smaller than their screw. It was tricky twisting them in. At one point I tried with a clamp tool and ended up merely breaking the hook part off.
That was a fail! I used the same clamp to unscrew the portion that was stuck in the wood. In the end, I used a towel and that allowed my hands to have a bit of cushion so it didn't hurt as much. Next time I would just have hubs or one of the older boys do it! HA!

I used wall mounts that I had on hand, and used a hammer to drive the nails in. The next tricky bit was attaching the shelf to the wall. I always get nervous that I'll place something on the wall and it will fall down. Well, let's be honest. I have had this happen more than once!
The shelf is 12 inches wide, so I went about finding the studs in my wall. Naturally, my studs are 14 inches apart!

In the end, I placed a 2.5 inch wood screw into the stud on the right hand side, and then used a heavy duty wall anchor made for plywood and 100 lbs on the other side.
I've placed pressure on the shelf and it doesn't seem to be going anywhere. I will wait a few months before claiming total victory though!

So what do you think? I think it would be so handy with several mugs and a basket to hold k-cups on the shelf! I actually grabbed 2 of these and think I will place the other one in our spare bathroom with hooks to hold hand towels.
This fun DIY was done with my favorite handy bloggers for yet another amazing collection of unique projects! It's truly amazing to see how we put such creative spins on products. Walnut Hollow has amazing products to choose from. You can order straight from their website or find their products in stores like JoAnn Fabrics! Be sure to check out their website to see the variety of products- you'll have lots of ideas spinning in your head I'm sure!
Guess what? Walnut Hollow has been so generous and is offering the chance for you to win these awesome products!
Walnut Hollow Sign Kit Giveaway
- Walnut Hollow Versa-Tool Hot Tool
- Walnut Hollow Hot Stamps Alphabet Set (Uppercase)
- Walnut Hollow Small Framed Wood Sign

Head on over to Walnut Hollow for dozens of surfaces that are ready for your creative ideas...
Visit these other project ideas with surfaces from Walnut Hollow to enter to win!

Atta Girl Says created a wintery centerpiece with birch logs
Seeking Lavender Lane assembled a tiered tray from clock faces
Hunt and Host whipped up a cozy winter sign using her hot tool
Robb Restyle shared an easy chalkboard sign project
Thanks for stopping by this week friends! I know it's hectic with Thanksgiving upon us! To help you out, I'm offering a free e-book with creative recipes for using leftover cranberry sauce! Be sure to grab it today!


ColleenB.~Texas says
Love your cup holder. I only wish I had kitchen wall space.
Thank You for this wonderful giveaway opportunity
latanya says
I love the dark wood. What a great space saver.
Rachel Clarke says
I would love something like this in my dining room. Great for display and a space saver.
Tammie says
Very cute project!
Mary Gardner says
I really like the mug holder and especially that it holds a lot but doesn't take up a lot of space.
MrsMajHoff says
Thanks Mary! I agree, sometimes small can be mighty!
MrsMajHoff says
Thanks so much Tammie! I have another shelf that I plan to put two larger hooks on to hold hand towels in my bathroom! The shelves are so versatile!
Philip Wilson says
So cute! I love the itty bitty holder and everything around it. 🙂